Easy Double Chocolate Sourdough Bread
Last Updated on December 24, 2025 by Jamie Saechao
This simple + easy double chocolate sourdough bread recipe is irresistibly delicious!
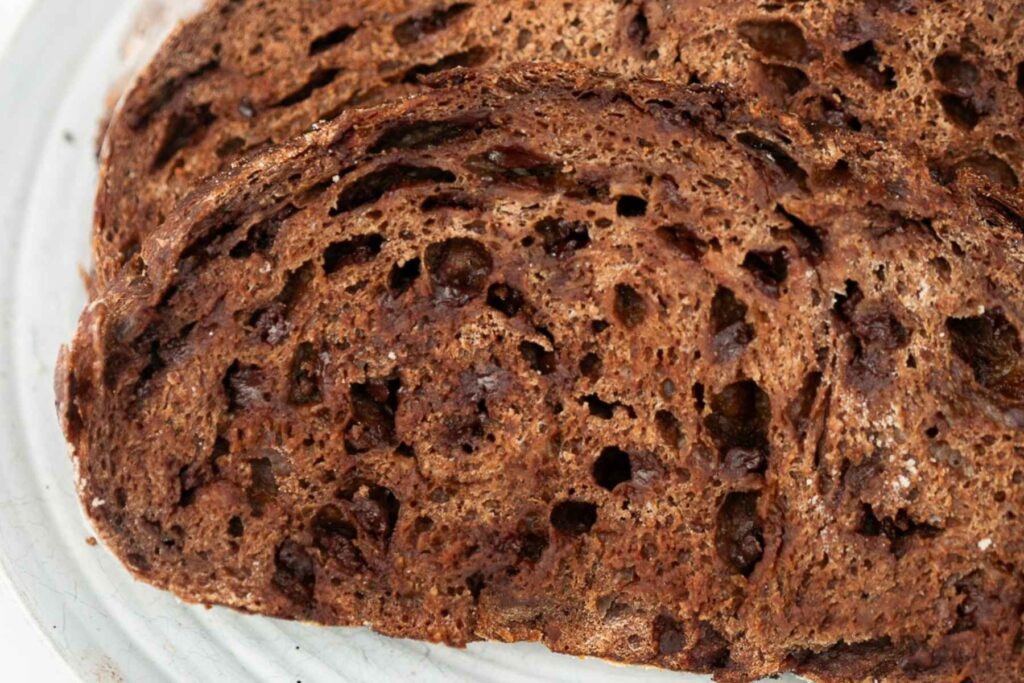
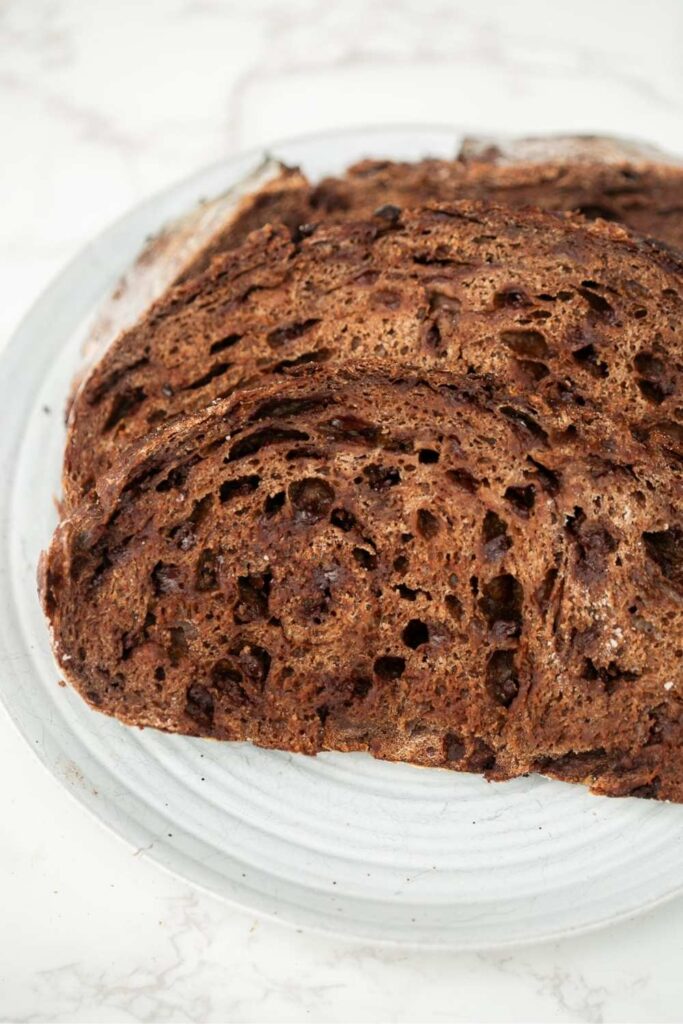
With chocolate morsels hidden in every bite and a subtle cocoa flavor, this decadent chocolate sourdough loaf can be enjoyed as a dessert or side dish.
The outside of the bread is crunchy and crisp, and the inside is perfectly soft and chewy. And the chocolate swirled within makes this bread a heavenly treat. This is truly the best sourdough chocolate bread!
This sourdough bread is made with a simple yet satisfying blend of cocoa powder, brown sugar, and salt.
The chocolate chips scattered throughout add a touch of indulgence, especially yummy when the bread is toasted and the chocolate melts.
My family enjoys this bread, slathered with nutella or peanut butter. We also enjoy it toasted with lots of butter for a rich wake-up call at breakfast!
This post contains affiliate links. If you click through and make a purchase, we make a small commission at no extra cost to you.
Looking for more easy sourdough recipes? Try this sourdough hamburger bun recipe, bagels, or sandwich bread! And if you love chocolate, try my sourdough chocolate brownies, sourdough chocolate chip bread, or sourdough chocolate croissant loaf.
Schedule
Though sourdough can be challenging, I’ve made this recipe as simple as possible to follow. There are just a few steps:
- Feed the sourdough starter 4-8 hours prior to making dough (1 pm)
- Mix dough (9 pm)
- Stretch + fold dough (9:45-11 pm)
- Overnight ferment
- Shape + cold ferment (8 am)
- Bake (9 am)
This is a sample timeline that can be adjusted to your needs.
Keep in mind that sourdough bread baking can be intimidating, it is actually quite forgiving. Even novice baker’s can pull off this impressive bread.

Tools
For this recipe you will need:
- Dutch oven
- Reliable kitchen scale
- Parchment paper
- A lathe or razor for scoring bread (this is the one I use)
- Large bowls for mixing dough
- Banneton for bread proofing (optional)
- Whisk
Let’s dive into the ingredients; then, we’ll walk step by step through baking this delicious chocolatey bread together.
Ingredients
Active Sourdough Starter: Your starter must be fed and active for this recipe. Your starter will be ready 4-12 hours, depending on the temperature of your kitchen. Learn how to make a starter here!
Bread Flour: Bread flour lends this recipe extra texture and chewiness, but you can substitute all-purpose flour with no problem.
Water: Use clean, high quality water. Chemicals like chlorine can inhibit sourdough’s vitality. If using tap water, be sure to filter it.
Cocoa Powder: I have used Hershey’s, Guittard, and this brand from Amazon.
Brown Sugar: Brown sugar lends a hint of sweetness to this recipe, rounding out the bold cocoa flavor.
Salt: A hint of salt offsets the sweetness and adds the perfect flavor to the dough. Salt also strengthens the dough and adds structure to the loaf.
Chocolate Chips: I use semi-sweet chocolate for this recipe, but you could use milk or dark chocolate if your prefer.

Recipe Notes
- For best results, let the bread cool completely before slicing. While 1 hour will suffice, I have gotten the best results from letting the bread cool for 3 or more hours. When sliced into earlier, you will have a moist loaf that is a little gummy.
- I do not preheat the Dutch oven for this recipe- when testing, the bread tended to burn in a preheated Dutch oven.
- Stretch and folds develop the dough but are flexible. If you only have time to fit in one set of stretch and fold’s, its okay.
- Substitute mini chocolate chips for regular sized ones, if desired.
- Set the oven rack to a lower rack prior to baking the bread.
How To Make Chocolate Sourdough Bread
Step 1: Feed Your Starter
You’ll need a fed, active starter for this sourdough bread. This means that the sourdough starter has been fed with water and flour and has fermented for several hours, resulting in an active and bubbly starter. The warmer your kitchen is, the faster your starter will be active after being fed!

Step 2: Measure and mix dough
Once your starter is active and bubbly, weigh out and mix all of the ingredients for your dough. I use this kitchen scale to measure my dough. Make sure to press “tare” to zero out the scale before weighing your ingredients.
Start by whisking together the cocoa powder, salt and flour.

Then, create a well in the middle of your dry ingredients. Add the water, sourdough starter, and brown sugar to the middle of the well. Mix well with a spatula, then form into a shaggy dough ball with your hands. The dough will be sticky.
Step 3: Autolyse
Next, you’ll want the dough to rest for 45-60 minutes. This resting period is called autolyse. During this time, enzymes break down the protein in the flour, making the dough easier to work with.
Cover the bread dough with a damp tea towel or plastic.

Step 4: Stretch + Folds
After the dough has rested, you’ll do a series of stretches and folds on your dough at thirty-minute intervals. Stretching and folding is done in place of kneading the dough.
The process strengthens the dough and adds air, resulting in those classic sourdough bubbles you find inside the crumb. After each set of stretching and folding, you’ll find your dough is smoother and easier to work with, and the stickiness will gradually fade.
Add in the chocolate chips as you do the stretch and folds.
To stretch and fold, grab one side of the dough, pull it up from the dough, then fold it over itself. Work your way around the dough until you’ve done a fold on four sides. Stretch and fold the dough three times at 30-minute intervals.

I try to keep most of the chocolate chips tucked into the dough- the ones on the outside of the bread burn during the baking process.
Tip: Rinsing your hands in cold water and using slightly damp fingers will help you better handle the sticky dough.
Step 5: Overnight Fermentation
After the last set of stretches and folds, leave the dough in the bowl and cover it with a damp towel, plastic wrap or shower cap.
The dough needs between 8-10 hours to ferment. Fermentation depends on the maturity of your sourdough starter and the kitchen’s warmth.
The bread is done fermenting when it pulls away easily from the side of the dough and has a slight dome in the center.

Step 6: Shape Dough + Place In Fridge
In the morning, the dough should be about double in size and be slightly domed on the top. Shape the dough by dumping it onto a floured work surface and folding the four sides inward, into a ball shape.
Flip the dough over and gently push it with one hand, then pull with the other, creating surface in the tension of the dough.
Set the dough into a banneton or simply flour the bottom of a bowl and place your dough in it. Cover, and refrigerate the dough for 1-2 hours.
Step 7: Score + Bake
Set the oven rack to the bottom position and preheat the oven to 425 degrees F.
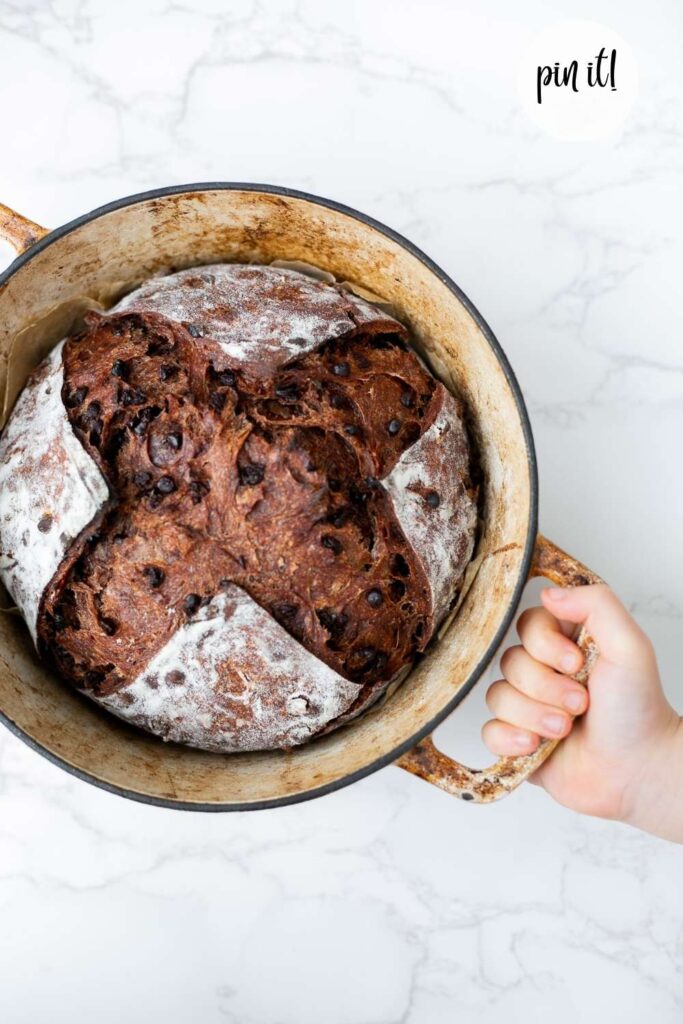
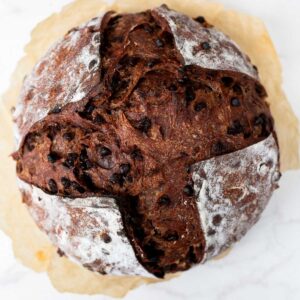
Place the dough on a piece of pre-cut parchment paper, place in Dutch oven and score the dough. I did a simple cross shaped score on this bread (not shown). Get bread scoring ideas here.
Place the bread in the oven and bake for 25 minutes, remove the lid and bake for an additional 22-25 minutes, taking care that the top does not burn.

Let the bread cool for at least 1 hour before slicing.
Topping Ideas
This chocolate sourdough bread is scrumptious on it’s own, but we’ve enjoyed it in the following ways:
- Sliced, toasted and topped with butter
- Warmed up with peanut butter
- Slathered with nutella (for us chocolate fanatics- I love this low sugar option)
- Topped with bananas and honey

For more easy sourdough bread recipes try:
Easy Double Chocolate Sourdough Bread
Equipment
- 1 Dutch Oven
- 1 Scale
- 1 Large Bowl
- 1 Spatula
- 1 Whisk
- 1 Banneton optional
Ingredients
- 40 grams cocoa powder
- 500 grams white bread flour or unbleached white flour
- 8 grams salt
- 50 grams sourdough starter fed and bubbly
- 375 grams water
- 50 grams brown sugar
- 120 grams chocolate chips add more or less to taste
Instructions
- Feed sourdough starter 4-8 hours prior to making recipe.
- Use a scale to weigh out the flour, cocoa powder, and salt. Whisk the flour, cocoa and salt very well.
- Create a well in the flour cocoa mixture, and weigh in the sourdough starter, water and brown sugar. Mix the dough with a spatula, then shape into a rough ball of dough using damp hands.
- Let the dough rest for one hour.
- Add in the chocolate chips, then perform three sets of stretch and folds on the dough, spaced thirty minutes apart.
- Cover the dough with a wet tea towel or saran wrap and allow to ferment overnight, until double in size. (This can take anywhere from 7-12 hours, depending on the temperature of your home).
- The next morning, dump the dough on a slightly floured work surface. Fold in the four sides of the dough to form a ball, then flip the dough over and shape by pushing the dough with one hand and pulling it with the other. Spin the dough in a circle several times to create surface tension.
- Place the dough either into a banneton or a lightly floured bowl. Set in the fridge for 1 hour and up to 3 hours.
- Move the oven rack to the bottom rung and preheat the oven to 425 degrees F. Place the sourdough loaf on a piece of parchment paper, then score the dough. Set the dough into the Dutch oven, put the lid on, and bake for 25 minutes. Remove the lid and bake for an additional 20-25 minutes, taking care the top does not burn.
- Once bread is done remove from Dutch oven and cool for at least one hour before slicing.
Notes
- Cooking time: Oven temperature can vary, affecting cooking time. My bread tends to be done right at 48 minutes, but you may find you need to bake yours longer. The crust should be a pretty golden brown color. You can also try the “knock test”. Use oven mitts and turn your loaf upside down. “Knock” on the bottom of the loaf. If it sounds hollow, it is done. If it gives you a dull sound, bake it for a few more minutes.
- For best results, let the bread cool completely before slicing, at least one hour but up to three hours for best results.
- I do not preheat the Dutch oven for this recipe- when testing, the bread tended to burn in a preheated Dutch oven. Feel free to experiment.
- Substitute mini chocolate chips for regular sized ones, or mix a bit of both!
- Make sure to set the oven rack to a lower rack prior to baking the bread to prevent the top from burning.